13 productivity tips
Knock out photographic post-production with these Adobe techniques in Photoshop, Lightroom and Camera Raw
• February 2016 issue
What I learned at Adobe Max
Each year Adobe Systems presents its Adobe Max Creativity Conference showcasing products that will hit the market soon and revealing what the company envisions for the future. But the real value to most participants is the bounty of sessions presented by industry educators. Participants get a creative boost and learn some helpful tricks. Presenters acknowledge that most users have a preference for either a Lightroom or Bridge/Adobe Camera Raw (ACR) workflow; ultimately, either application can produce the same result. Choose the one that suits your work best and learn all of the tips, tricks, and keyboard shortcuts that will enhance and speed your own workflow. Some tips shown here may be available only in the newest software update.
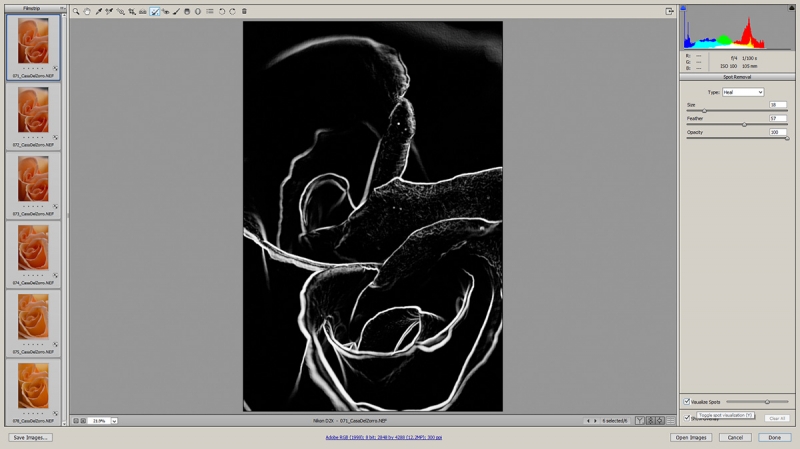
1. REMOVE DUST (Adobe Camera Raw). This is a neat trick for removing sensor dust from multiple images. Open the files (preferably in raw file format) in ACR and select them all (Cmd/Ctrl+A). Select the Spot Removal tool icon (B). Click the Visualize Dust checkbox and adjust the slider to see the dust spots. Remove the spots from one image, and they’ll disappear from all the rest. (Source: Julieanne Kost)
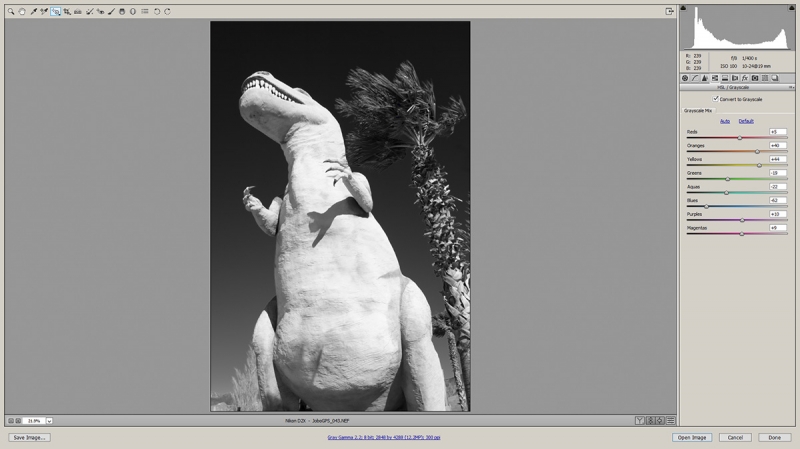
2. CONVERT TO GRAYSCALE (Adobe Camera Raw). With an image open in ACR, select the HSL/Grayscale tab. Click the Convert to Grayscale checkbox and click Auto if you do not have your ACR Preferences set to Auto Color Mix for grayscale conversions. The Auto conversion usually isn’t terrible, but you can improve it quickly. Select the Targeted Adjustment Tool (T) and drag the mouse downward to darken a tone in the preview window or upward to lighten a tone. Watch the eight Grayscale Mix sliders to see which tones are affected. Click and drag as many times as you want, then make final adjustments with the individual Grayscale Mix sliders. (Source: Julieanne Kost)
3. CUSTOMIZE TOOLS MENU (Photoshop). A new option in the Edit dropdown menu allows you to customize the tools that appear in any workspace. You can now set up and save a custom portrait retouching workspace, for example, with only those tools you would use for portrait retouching. With the ability to customize the tools menu, you can separate tools that are nested together by default and have them visible separately. (Source: Julieanne Kost)
4. USE KEYBOARD SHORTCUTS (Photoshop). I learned several keyboard shortcuts that are now speeding my work. Using Cmd/Ctrl+, (comma), I toggle layer visibility on and off without having to click the little eye icon of the layer. Some of my work involves Free Transform changes, and I use Cmd/Ctrl++/- (plus or minus) to keep the image on the screen. Center the image with Cmd/Ctrl+0. Finally, I no longer use the bracket keys to change the brush size: On a Mac, just hold the Control + Option keys and drag the mouse left or right to change the brush size. Hold the same keys and drag up and down to change the brush feather. On Windows, hold the Alt key and the right mouse button and drag. (Source: Julieanne Kost)
5. OPEN IMAGES FROM LIGHTROOM TO PHOTOSHOP (Lightroom). There are several ways to open images from Lightroom into Photoshop. One is as simple as using Cmd/Ctrl+E. However, if you’ve made Develop settings in Lightroom, they will not carry over to Photoshop. To keep your Lightroom Develop adjustments, select Edit In>Open as Smart Object in Photoshop. Access those Lightroom adjustments by double clicking the Smart Object thumbnail. The image opens in ACR with your Develop settings applied. Saving it back to its original folder as a PSD file returns the image to Lightroom. (Source: Dave Cross)
6. SAVE TIME MAKING HDR AND PANORAMIC IMAGES (Lightroom). Don’t bother making any local adjustments such as healing to the original files before merging to HDR or a panorama. Local adjustments are ignored, but global adjustments are not. (Source: Dave Cross)
10. ADD TEXT OR GRAPHICS (Lightroom). Use the Identity Plate panel in Lightroom’s Print module to add text or graphics, such as a couple’s names, to a lot of images. First, create a new document in Photoshop with a transparent background, for example 300x300 pixels, then type or paste text or graphics and save it as a PNG file.
Open Lightroom, switch to the Print module and select a template from the Template Browser. Drag a photo to the empty template and size it, leaving an area for the graphic outside the image or in a clean area of the image. To load the graphic, open the Page panel and click the Identity Plate checkbox. Click the small triangle in the identity plate box to open the Identity Plate Editor. Click the Use graphical identity plate radio button, navigate to the graphic PNG, and click on it to load it into the identity plate box in Lightroom and onto the image. Use the options in the Identity Plate panel to adjust the graphic. If you want it to appear on every image, click the Render on every image checkbox. You can create identity plate presets by clicking Custom in the Identity Plate Editor window and saving. (Source: Dave Cross)
11. SHOOT A PANORAMA OF PEOPLE (Photoshop). I used this trick less than two weeks after the conference to photograph a group. You can create a group shot panorama by photographing subjects in clusters with about 30 percent overlap and open the images as layers in Photoshop. With all of the layers selected, choose Edit>Auto-Align Layers>Auto, and Photoshop does a decent job of aligning even handheld group shots into one panorama. Adding layer masks and transforming may also be needed. (Source: Chris Orwig)
12. CORRECT BLEMISHES (Photoshop). Retouch small blemishes first, then the larger ones. You waste time by doing the opposite. Use the H key to hide the retouching circles so you can easily see your progress. And be sure to create a separate layer for cloning or spot healing. Better still, create layers for cloning and spot healing with layer blending set to Darken in some and Lighten in others. (Source: Chris Orwig)
13. RETOUCH TEETH CONVINCINGLY (Photoshop). For teeth, create a Hue/Saturation adjustment layer and use the Targeted Adjustment tool (pointing hand icon in Properties menu). Drag left or down to lower the saturation. Add a layer mask revealing only the teeth, duplicate the layer, change the blending mode to Soft Light and adjust the opacity until it looks right. (Source: Chris Orwig)
BONUS TIP! RETOUCH EYES NATURALLY (Lightroom and Photoshop). Retouching the eyes is a delicate and important adjustment to a portrait. In Lightroom, use the Adjustment Brush to increase exposure and clarity. In Photoshop, create a mask for the eyes, make adjustments, and Smart Sharpen the eyes with a low radius setting and a high amount setting. (Source: Chris Orwig)
Stan Sholik is a commercial/advertising photographer in Santa Ana, California, specializing in still life and macro photography.